Flashing a Live Image
Table of Contents
Before You Get Started
You will need three things:
- A computer with a USB port and at least 4GB of free space on the hard drive.
- A USB drive of at least 4GB. **It will be completely erased**
- An Internet connection to download the image file and flashing utility.
Begin
Turn on your computer. It can be Windows 7, 8, 10 a Mac or another Linux desktop. Both desktops and laptops work equally well, the process is the same regardless. The live USB you create can be used on ANY computer, not just the one you create it on.
Before you continue, remove any USB drives, thumb drives and SD cards from your computer. USB mice, keyboards and printers are safe to leave plugged-in, but all removeable storage should be removed to ensure you don't accisdentally erase anything.
The example computer used in this tutorial is a 2013 Lenovo laptop running Windows 7.
Gather
Step 1 - Download the Image Files
Open your web browser and navigate to the page that fits your needs. For family use, including the Home and Kids Editions, go to this page. For the corporate editions, go to this page.
The links will open in a new window/tab so you can keep your place on this page. Save the files to a location you will remember. and then close the window/tab.
Unless you have customized the setting, most browsers default to saving files in the Downloads folder.

Step 2 - Pick a Flash Utility
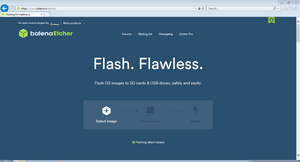
While you have your browser open, you can search for a USB flash utility. If you are already familiar with one, use it! Balena Etcher is used in this tutorial. We like Etcher because it can run portable (no install needed) and it will detect USB drives when they are plugged in so there is less of a chance you will erase your hard drive. That's right, its possible, if you aren't careful!
If you would like to follow along with Etcher, their website is here. As before, this link will open a new window/tab to keep your place here. One you download the flash utility, close the new window/tab.
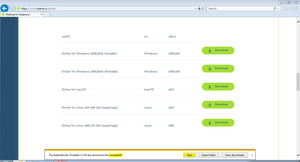
Step 3 - Download the Flash Utility
If you have decided to use Etcher, we recommend using the portable version. It doesn't require an install making things much easier. Below is the version we downloaded for Widows 7. It would be the same for other versions of Windows.

Step 4 - Run
Once the download is complete, you can click Run in the browsers notification box. If your browser doesn't give you that option, just go to your Downloads folder and open the file.
**You may get what is called a "pop-under" from Windows when you run this file. Etcher needs administrative privileges to run, Windows will ask if you want to allow it. Sometimes, this window is flashing in the taskbar under all the other windows on the screen.
Flash
Step 5 - Source
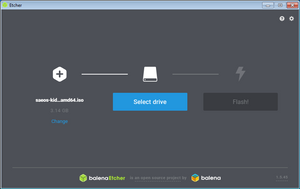
If you've followed all the steps thus far, when Etcher opens, it should look like this. If the Select Drive button in the middle is blue, instead of how it appears below, you have a USB drive plugged in. Make sure that is the drive you want to use! If you continue, that drive will be erased.
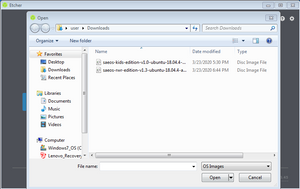
The first step is picking the image you want flashed to the USB drive. Click Select image...
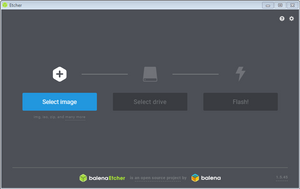
Browse to the file we downloaded in step 2 and click Open.
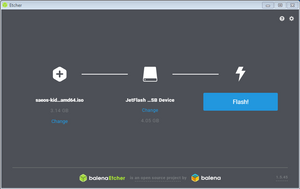
Step 6 - Insert the Destination Drive
Now it's time to pick the drive you want to install the image onto. Do NOT click Select Drive, instead, insert your USB drive now. Remember, it will be erased
Step 7 - Destination
Etcher will automatically detect the USB drive once you plug it in, and select it for you. This is the safest way to ensure you do not unintentionally overwrite anything. If Windows gives you a pop-up about formatting the drive, ignore it or click cancel on the pop-up. The install process will do that for you. Go ahead and click Flash!
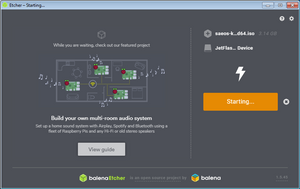
Step 8 - Admin Access
On this Windows 7 laptop, it was stuck on "Starting" because Windows opened a box asking me to confirm I wanted Etcher to erase the USB drive, the problem was, this popped up BEHIND the Etcher window. It was flashing down in the taskbar. If this happens to you, just click the flashing window and click OK. Mac and Linux desktops also ask for confirmation. Depending on your version, you may be asked for an admin password.
Step 10 - Flashing
The flashing process took about 5 minutes on this 6-year-old Lenovo with a USB 2 drive. This may be quicker for you depending on the speed of the laptop and the USB drive you are installing onto.

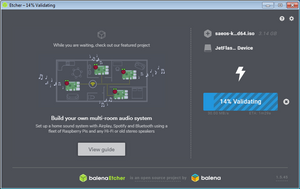
Step 11 - Validating
After flashing, Etcher will validate the install is good. This should take about two minutes.
Step 12 - Done
When done, you will see a, "Flash complete!" message. Close everything, including Etcher, leave the USB drive plugged-in and restart the computer.

Once you flash the image onto a USB drive, you can boot your computer from it by inserting the USB drive into a powered off desktop or laptop. Before you turn it on, be ready to watch the screen for a boot menu option screen. There is usually a quick message explaining what key to press for boot options or a boot device menu. Common keys are:
- Lenovo pre 2019 - Enter and/or F12
- Lenovo 2019 and newer with Windows 10 UEFI - Either from the Windows Login screen or in Windows, click Power, Shutdown, Restart. Hold down the shift key when clicking Restart and keep holding it down until you see the red Lenovo Logo. Then hold down the Fn key and press F2
- IBM - Enter or Blue Thinkvantage button
- Intel - F10
- HP Elitebooks - ESC key


